Secure Boot is a security feature built into modern PCs that helps protect your system from unauthorized software during startup. Some games and applications require Secure Boot to be enabled in order to run properly. Most PCs already support Secure Boot, but depending on your BIOS settings, it may be turned off by default.
This guide walks you through how to check your Secure Boot status, what the results mean, and where to find the steps needed to enable it on your device.
Before making any changes, keep in mind that BIOS and UEFI menus vary depending on your hardware manufacturer. Adjusting these settings incorrectly can cause system issues, so always follow the official instructions from your PC or motherboard manufacturer.
Step 1: Ensure Secure Boot is Enabled
- Press Windows Key + R to open the Run window
- Type msinfo32 and press Enter
- In the System Information window, look for the following fields (you can use the search bar at the bottom):
- BIOS Mode: Should say UEFI
- Secure Boot State: Should say On
Secure Boot State: ON 🟢
You're good to go! Secure Boot is already active. You can launch your game.
If you're still getting kicked, check the VAN: RESTRICTION guide.
BIOS Mode: UEFI and Secure Boot State: OFF 🔴
Skip straight to Step 3. Your drive is formatted perfectly, we just need to flip the switch inside your BIOS.
BIOS Mode: LEGACY and Secure Boot State: OFF or Unsupported
Stop! Proceed to Step 2. Secure Boot requires UEFI mode. If you try to force UEFI in your BIOS without converting your drive first, your Windows won't boot! We need to convert your drive format first.
Step 2: Convert Your Drive (Legacy Users Only)
Warning: Do NOT skip this step if you're on Legacy
If you switch your BIOS to UEFI without converting your drive first, Windows will not boot. You must convert MBR > GPT before changing anything in BIOS.
Check Your Disk Partition Style
Secure Boot requires your system to use the GPT (GUID Partition Table) partition style. If your drive is using MBR (Master Boot Record), you will not be able to switch your BIOS Mode to UEFI until it is converted.
Follow these steps to check your partition style:
- Type Disk Management in the Windows search bar and press Enter
- Right click the drive that contains your Windows installation
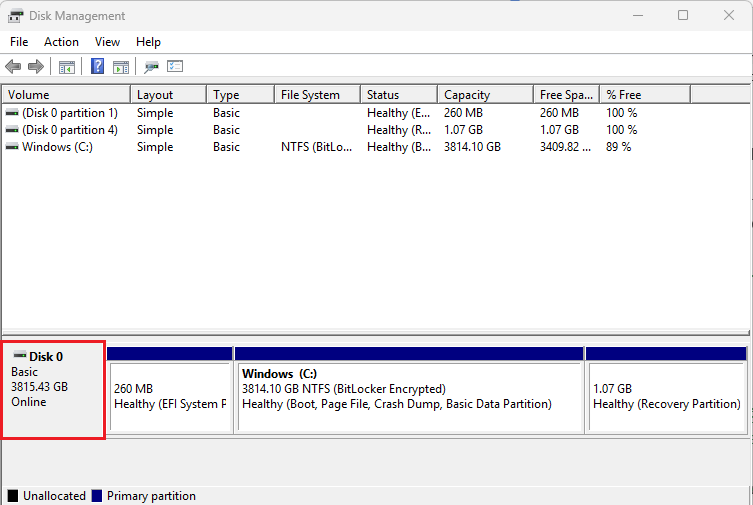
- Select Properties
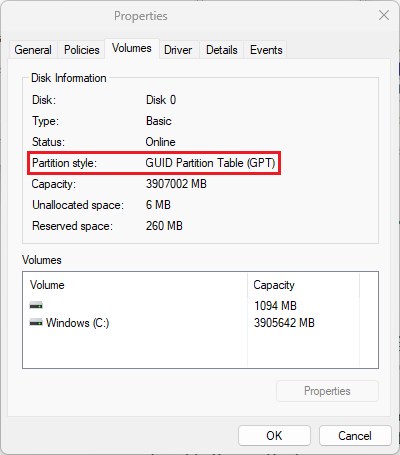
- Open the Volumes tab
- Look for Partition Style
- GPT > Your drive is fine. Skip straight to Step 3.
- MBR > You need to convert. Continue below.
Requirements to convert MBR to GPT
⚠️ Important: If your system is currently using Legacy BIOS, do not switch to UEFI until your drive has been converted from MBR to GPT. Changing to UEFI before converting the drive can prevent Windows from booting.
Make sure the following conditions are met before converting:
- Windows 10 version 1703 or later
- MBR disk has no more than three partitions
- Operating system is 64-bit
- BitLocker or any other encryption is turned off
- No dual boot setup
- BIOS supports UEFI mode
- Secure Boot is disabled
Check out Microsoft's official step-by-step guide for this process.
How to convert MBR to GPT
Before anything else, BACKUP YOUR FILES! This process is safe, but cannot be reversed. Make sure you have your files backed up before continuing.
- Press Windows Key, type cmd
- Right click Command Prompt and select Run as administrator
- Type: mbr2gpt /validate /allowFullOS
- Press Enter
- If validation succeeds, you can continue
- Type: mbr2gpt /convert /allowFullOS
- Press Enter
- Do NOT reboot into Windows yet. Go directly to Step 3 to switch your BIOS from Legacy to UEFI.
Once Windows boots successfully, you can enable Secure Boot again.
Step 3: Enable Secure Boot
Before you begin, keep in mind that BIOS and UEFI settings vary depending on your hardware manufacturer. Adjusting these settings incorrectly can cause system issues. Always follow the official instructions provided by your PC or motherboard manufacturer when making changes. Riot is not responsible for any issues that may result from modifying your BIOS or UEFI settings.
The resources included in this guide are not monitored or owned by Riot Games, so use them at your own risk!
Requirements before enabling Secure Boot
Make sure the following conditions are met:
- BIOS Boot Mode is set to UEFI (not Legacy or CSM)
- Disk Partition Style is GPT, not MBR
- Secure Boot is enabled in your BIOS
The steps below outline what you may encounter during the process, but they are not a full set of instructions. Always refer to your PC or motherboard manufacturer’s official documentation for exact guidance.
Access your BIOS or UEFI settings
- Windows 11:
Start > Settings > System > Recovery > Advanced startup > Restart Now - Windows 10:
Start > Settings > Update and Security > Recovery > Advanced startup > Restart Now
After your PC restarts:
- Select Troubleshoot
- Go to Advanced options
- Select UEFI Firmware Settings
This will reboot your system into the BIOS interface. Alternatively, you can access the BIOS by restarting your PC and press Del, F2, or F10 before Windows loads. (Key varies by brand.)
Locate Secure Boot Settings
- If you just converted from MBR > GPT: Find Boot Mode and change it from Legacy/CSM to UEFI.
- Disable CSM if that option exists.
- Navigate to the Boot tab inside BIOS.
- If you cannot find Secure Boot, many BIOS interfaces have a built in search (often accessed with F9)
- Refer to your PC or motherboard documentation for model specific instructions
- Set Secure Boot (or Secure Boot State) to Enabled
- Save your changes and exit BIOS (usually F10)
- Restart your PC normally
Step 4: Confirm Secure Boot is Enabled
Once you are back in Windows:
- Press Windows Key + R, type msinfo32, hit Enter.
- Confirm BIOS Mode says UEFI.
- Confirm Secure Boot State says On.
Additional Secure Boot Troubleshooting
If you run into any issues while taking the above steps, check below for more help.
Secure Boot is grayed out or won’t turn on?
You might have corrupted or outdated Secure Boot keys. We need to restore the factory defaults.
BitLocker Warning: If you have BitLocker drive encryption enabled, resetting Secure Boot keys will change your TPM measurements and trigger BitLocker recovery on next boot. Before doing this, either suspend BitLocker (Control Panel > BitLocker Drive Encryption > Suspend protection) or make sure you have your BitLocker recovery key ready. Without it, you will be locked out of Windows.
- Enter your BIOS and find the Security or Boot tab.
- Look for an option called Key Management.
- Select Restore Factory Keys (may also be called Install Default Secure Boot Keys or Reset to Setup Mode).
- Once the default keys are installed, go back and set Secure Boot to Enabled.
Secure Boot is enabled, but it is still returning an error?
Your BIOS firmware may be outdated, or your BIOS may not fully support Secure Boot. An old BIOS can report Secure Boot as "enabled" but fail policy checks that Vanguard requires.
- Press Windows Key + R, type msinfo32, hit Enter.
- Note your BaseBoard Manufacturer and BaseBoard Product (this is your motherboard model).
- Visit your manufacturer's support/downloads page (links below), search for your exact model, and download the latest BIOS.
- Follow the manufacturer's flashing instructions (usually involves a USB drive and a BIOS utility).
Manufacturer BIOS download pages:
- ASUS Download Center
- MSI Support Downloads
- Gigabyte Support
- ASRock Support
- Dell / Alienware Support
- Lenovo Support
- NZXT Support
Tip: Most manufacturers have a BIOS flashback or EZ Flash utility built into the BIOS itself. You typically download the BIOS file, put it on a FAT32-formatted USB drive, then use the built-in utility to flash it. Do NOT turn off your PC during a BIOS update.
If your hardware physically doesn't support UEFI/Secure Boot after updating, it may not be compatible with Vanguard's requirements.
If you're seeing VAN: STATUS_SB_POLICY specifically, see the "Secure Boot is grayed out" section above to reset your keys to factory defaults. More info: Error VAN: STATUS_SB_POLICY.
See the VAN: RESTRICTION guide under "Update BIOS Firmware" for more details.
Reset Secure Boot Keys
In some cases, Secure Boot may be enabled but still not function correctly due to corrupted or outdated Secure Boot keys. In that case, reset your secure boot keys.